About cookies on this site Our websites require some cookies to function properly (required). In addition, other cookies may be used with your consent to analyze site usage, improve the user experience and for advertising. For more information, please review your options. By visiting our website, you agree to our processing of information as described in IBM’sprivacy statement. To provide a smooth navigation, your cookie preferences will be shared across the IBM web domains listed here.
Tutorial
Create mobile web applications with HTML5
Explore all the features of HTML5 for mobile web apps: geolocation, local storage, offline, web workers, and more
On this page
HTML5 is a popular technology since its early days and for a very good reason. It brought desktop application-like capabilities to the web browser -- not just on the desktop but also on mobile devices.
In this tutorial, separated into five parts, we will take a look at some of the popular features that are part of HTML5. In each part, we will also write some code to showcase these features and see how they work on both desktop and mobile browsers.
- Part 1: Create mobile web applications with HTML5 and geolocation APIs
- Part 2: Create mobile web applications with HTML5 and local storage
- Part 3: Create offline mobile web applications with HTML5
- Part 4: Speed up your mobile web applications with HTML5 and Web Workers
- Part 5: Create mobile web applications with HTML5 and its new visual UI features
Prerequisites
The code in this tutorial is using core web technologies like HTML, CSS (Cascading Style Sheets), and JavaScript. To test the application on desktop and mobile, we recommend using the latest web browser versions.
Part 1: Create mobile web applications with HTML5 and geolocation APIs
In this part of the tutorial, you will tap into one of the most popular new technologies available to mobile Web applications: geolocation. High-end smartphones all have GPS built-in to them, and now you will learn how it can be used by a Web application. You learn how to use the various aspects of the geolocation standard and how to use it with some popular Web services to create an interesting mobile mashup.
The basics: Getting a fix
The geolocation API provides a standardized interface for users to share their locations with trusted websites. It allows a website to retrieve the geographical location information of a user, like latitude and longitude. This information can be used to display location-aware content. For example, a business can use this information to point a user to their nearest store based on the user's location, or display different content based on a user's country.
In this example, we will use the geolocation API to display the current temperature at the user's location using getCurrentPosition.
As you can see, the geolocation object is part of the standard navigator object. The most commonly used function offered by the geolocation API is getCurrentPosition. The getCurrentPosition function can be used to retrieve a user's position; it requires the consent of the user, and it's an asynchronous operation.
The function takes three parameters: The first is a callback for success; the second is a callback for error; and the third is to pass options like accuracy, timeout, and cache max age. The last two parameters are optional.
The success callback function takes a single parameter of type Position. The Position object has two properties: coords and timestamp. Here, coords is of type Coordinates, which represents the current location, and the timestamp represents the time at which the location was retrieved. We are mainly interested in the coords, so let's examine the coordinates object in detail, which has the following properties:
- latitude
- longitude
- altitude
- accuracy
- altitudeAccuracy
- heading
- speed
It is worth mentioning that not all of these properties will be available on all devices, except for latitude, longitude, and accuracy.
In case of an error, the error callback is called with a single parameter of type PositionError. The PositionError object has two properties: code and message. The message is device-specific and is useful for debugging. The code can have one of the three values:
- PERMISSION_DENIED (1)
- POSITION_UNAVAILABLE (2)
- TIMEOUT (3)
Our application can use these error codes to display a meaning full error to the user.
And the options parameter takes a PositionOptions object, which has the following properties:
maximumAge: maximum age of the cached positiontimeout: amount of time before the error callback is invokedenableHighAccuracy: used if a highly accurate position is requested
Now that we have looked at the API in details, let's look at a simple example that shows how to use this function.
Integrating with Open Weather Map API
Let's create a simple web app where we will use the geolocation API to get a user's location and use their location to show some location-aware content, which in this case will be the temperature.
For this example, we will use the current weather API provided by Open Weather Map. We will start by creating a free account and generating an API key, which will be required for calling Open Weather Map APIs. The free account is limited, but should be enough for our simple application.
As you can see, the page loads the initialize function, which is invoked and will call the geolocation API getCurrentPosition function.
When the user's position is retrieved successfully, the geolocation coordinate (latitude and longitude), will be used to get the current weather information using the Open Weather Map API. Once you get the response back from the API, use the location name and temperature to display the information to the user. Our code also handles the error scenario, displaying an alert if there is an error while retrieving the user's position.
This is a simple example, but you can see that with just a few lines of code, you can get the user's location information.

In our location-aware application, you only need to get the user's location once to display some location-specific data. However, what if you need to keep track of a user's location as they move? For this, you can use the watchPosition and clearPosition functions, which are also part of the geolocation API.
More advanced: Tracking
The geolocation API watchPosition function takes the same parameters as the getCurrentPosition function, such as success callback, error callback, and position options. However, in this case, the success callback function is called each time the user's position changes. When watchPosition is called, it returns a watch ID, which can be used to unregister the success callback by using the geolocation clearWatch method.
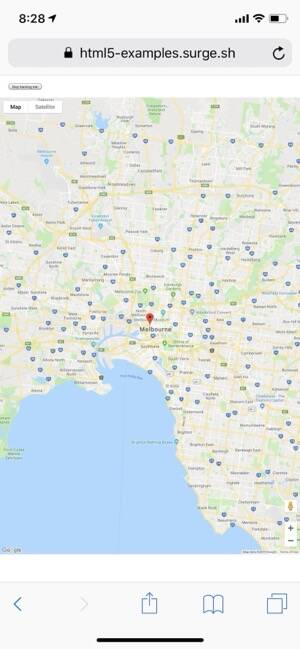
Integrating with Google Maps
To demonstrate the user-tracking feature, we will use Google Maps APIs. We will develop an app to show the user's location on a map and update the map each time the user's location changes. The following code listing shows the mapping code with geolocation.
Similar to the previous example, once the body of the document loads, the initialize function is invoked. This function uses the getCurrentPosition method to retrieve the user's location. When it gets the location, it creates a map using the Google Maps API. Notice how the latitude and longitude are used to create an instance of google.maps.LatLng. This object is used to center the map. Create a marker on the map to represent the current location of the user. The marker once again uses the latitude and longitude we received from the geolocation API.
After creating the map and putting a marker on it, we start tracking the user. We capture the ID returned from watchPosition. Whenever a new position is received, we re-center the map on the new location and move the marker to that location.
The showLocation function is called when the map is initially drawn and an update to the user's location is received. It uses an instance of google.maps.Geocoder (created at the beginning of the initialize function in the previous code listing). This API allows you to perform geocoding, or taking an address and turning it into mapping coordinates (latitude and longitude). It also performs reverse-geocoding, taking mapping coordinates and returning a physical address. In this case, take the coordinates produced by the geolocation API and use the Google Maps API to reverse-geocode them. The results are then displayed on the screen.
The last function in the previous code listing is the stopTracking function. This is called when the user clicks on the button created in the HTML. Here you use the trackerId obtained when you first called the watchPositionfunction. Simply pass this to the clearWatch function, and the browser/device will stop getting the user's location and will also stop calling the success callback function. The following figure shows the tracker app in use.
Part 2: Create mobile web applications with HTML5 and local storage
One of the most useful new features in HTML5 is the standardization of local storage. Finally, Web developers can stop trying to fit all client-side data into 4 KB Cookies. Now you can store large amounts of data on the client with a simple API. This is a perfect mechanism for caching, so you can dramatically improve the speed of your application -- a critical factor for mobile Web applications that rely on much slower connections than their desktop brothers. In this part of the tutorial, you will see how to use local storage, how to debug it, and you will see a variety of ways to use it to improve mobile Web applications. In this part of the tutorial, you will develop a web application to showcase the Local Storage API.
Local storage 101
As websites became more dynamic and data-driven, the need to store data on the client side increased. In many scenarios, web applications need to manage their own state and data, whether to make the app more efficient or because the servers are becoming stateless, and storing client’s data is either insecure or inappropriate. For a long time, HTTP cookies were used for this, but they have their own limitations and may not be the ideal solution.
Fortunately for web developers, the HTML5 specification contains a standard for local storage that is now implemented and used by all popular browsers.
Web Storage API
The Web Storage API offers a way for browsers to store data as key-value pairs. It provides two mechanisms to store data:
sessionStorage- Web storage implementation that stores data during a page session. The data is deleted once the session is over, for example when the browser is closed.localStorage- Web storage implementation that is persistent across multiple sessions even when the browser is closed and reopened.
The two implementations share the same interface and have their own use case. We will focus on localStorage only. Let’s look at the Local Storage API.
In the previous code listing, you can see all the methods and properties exposed by the storage interface. You can access the local storage using window.localStorage. The setItem(key, value) will add the key-value pair to the storage or update the value if the key already exists. The getItem(key) function returns the value associated with the key, or null if the key does not exist. To remove a key-value pair from the storage, you can use the removeItem(key) function; and to remove all key-value pairs, use the clear() function. Finally, you can use the length property to get the total number of key-value pairs stored and use the key(index) function to get the key stored at a specific index. Combining the length and key functions, you can iterate over all of the stored key-value pairs.
There are lots of interesting use cases for local storage. It can be used for caching or saving user preferences. Let’s look at an example that demonstrates how to use local storage to save user preferences.
Example: Store user preferences with local storage
In this example, you will see how to use different methods and properties exposed by the storage API. You can start by saving and retrieving a simple key-value pair in the local storage. Let’s say you want to show how many times a user visited your web page. Store the count in local storage, update the count on each page load event, and then display the count to the user.
It is important to note that the local data storage is not shared across different browsers, so for any use case where you need the data across different browsers or devices, it is recommended to store the data on the server side.
In the code above, you call the initialize function on the loaded page. The local storage is accessible via the global window object using the window.localStorage property. The initialize function first checks if the browser supports local storage. If it does, you will retrieve the current visitCount using the localStorage.getItem function. If the key does not exist, set an initial value of zero for the count variable. The local storage stores the value as a string, so use parseInt to convert the value to integer. Next, increment the count and save the new value using the localStorage.setItem function. Finally, call the updateDOM function, since this retrieves the count value and writes it to the DOM.
If you open your web page and refresh it, the visit count value will update. Even if you close the browser and open it again, the visit count value will increment properly. You can use the browser’s developer tool to inspect this value.
As you have seen, it is easy to use the Local Storage API to store and retrieve a key-value pair. In our example, we stored a simple integer, but you can use the same API to store complex objects if required.
Let’s extend our example to store a JSON object in the local storage.
In the previous code listing, we made a few changes to the initial code. We added three buttons with labels: Red, Green, and Blue. These buttons call the setColorPreference function on click and pass the color value to this function. This setColorPreference function takes the color as a parameter, creates a preference JSON object, and stores that in the local storage. Here we are using the JSON.stringify(preference) function to convert the JSON object to a string. After storing the user preference in local storage, call the updateDOM function.
You have modified the updateDOM function to get the stored preference from the local store using the localStorage.getItem("preference") function, then converted the string value to preference the JSON object using JSON.parse(storedPreferences). If the value is empty, initialize the preference as an empty object and update the body background based on the color stored in the preference.
Now that you have stored both a simple value and a JSON object to the local storage, let’s explore other functions exposed by the storage API.
In the previous code listing, we added two new buttons to the page: one to remove the visit count and the other to clear all stored key-value pairs. The Remove count button calls the removeCount() function on click, and the Clear all button invokes the clearAll() function.
In the removeCount function, use the localStorage.removeItem("visitCount") function to remove the visitCount key-value and in the clearAll function use the localStorage.clear() function to clear the local storage. In both the functions, we invoke updateDOM() to update the DOM.
Let’s look at how to retrieve all of the key-value pairs stored in the local storage.
First, add an unordered list element <ui id="storedItems"></ui> to your page, as shown in the previous code listing. This will be used to display the list of key-value pairs that are stored.
Now add a new function showAllStoredKeyValues, shown in the following code listing. This function first uses console.log to store the number of values in the local storage using the localStorage.length property. You then use localStorage.length to loop through the stored key-value pairs. Use localStorage.key(index) to get the key stored at that index, then use the localStorage.getItem(key) function to get the value. Then add the key-value pair as a list item to the storedItems list.
Finally, update the updateDOM function to call the showAllStoredKeyValues function.
With this simple example, you have seen how to use all of the functions and properties exposed by the storage API.
Part 3: Create offline mobile web applications with HTML5
Part of the appeal of mobile applications is that you can take your application and its data with you wherever you go. One reality of mobile is, at times, a mobile device does not have a working connection to the Internet. This might seem to be an insurmountable problem for mobile Web applications. However, Web applications have evolved and become capable of working offline.
In this part of the tutorial, you will learn how to offline-enable your mobile Web application and learn to detect when your application goes from offline to online and vice-versa. You will develop a web application to showcase the offline support in HTML5.
Making your application work offline
The goal in this part of the tutorial is for our web application to be as close to a native application as possible. To do this, we must support some of the features that native applications provide, and working offline is one of these features. Even for a data-driven web app that relies heavily on Internet connectivity to access web services, the app should gracefully handle offline mode instead of completely failing.
Web browsers have the ability to cache static resources. They use the metadata from the HTTP response headers to cache static assets like HTML, CSS, images, and even JavaScript. HTML5 introduced another approach to support caching and offline mode. It not only gives better control over the caching but it allows different versions of the same resource for offline and online mode if required.
All of this may sound complicated, but in reality, adding offline support to a web app is quite straightforward. You just need to create a cache manifest file and tell the browser to use this file for caching.
The cache manifest
They key file required for the offline support is the cache manifest file. This file contains information on what to cache and what not to cache. The following code listing shows an example of a simple cache manifest.
This file lists all the resources that our application requires to function properly in offline mode. This includes HTML, CSS, images, JavaScript, etc. In our example manifest file, all of the URLs are relative to the cache manifest file. Let’s look at the directory structure of the application.
All the files listed in the manifest file will be cached by the browser and will be available in offline mode.
One important thing to note in the previous code listing is the comment with version information. This is just a comment and not part of any specification, but we need to change the manifest file every time if the resource listed in it changes. For example, if there is a new version of the app.css file, the browser will not load the new file if the cache manifest file is the same. One way to tell the browser to reload resources is by changing the manifest file. When changing something in the manifest file, the browser will reload the resources. In this case you can just increment the version number.
Once you have the manifest file, update the app to inform the browser to use this file and enable caching. As you can see in the following code listing, just add the manifest attribute to the HTML tag of the web page with the manifest file name.
To test an app with offline support, deploy the app code to a web server, access the app once, then turn off the Internet connection and try to access the app again.
When using the cache manifest, the MIME type of the manifest file should be text/cache-manifest. If you are using the Apache web server, this can be done by using an .htaccess file.
Now that you have seen the essential ingredients in creating offline web apps using HTML5, let’s look at an advanced example to explore more of the capabilities of offline web apps.
Advanced example
In the previous example, all the files used by our web app were static assets. Although it is good to be able to see all static content in offline mode, many of the web apps are data-driven. Most of the web apps are dynamic in nature, so they make network calls to retrieve data from the server. In this example, we will see how to handle offline mode for data-driven apps.
In this code, we call the initialize() function on the page load. In this function, we detect whether the browser is online. If navigator.onLine is true, the browser is online; if not, then it is offline. Based on the status, update the status variable and display the state to the user.
Now that you know how to determine whether the browser is online, extend our example to make the HTTP call to retrieve some data only if the browser is online. For this example, we are using the REST Countries API, which provides various APIs to retrieve country-related information. Our example uses the API to retrieve a list of countries. You can look at their documentation for details.
As you can see, we updated the code to call the retrieveCountries() function when the browser is online. The function uses XMLHttpRequest to make an HTTP call and retrieve a list of countries using the REST countries API. Upon receiving a response from the server, we pass the list of countries to the displayCountries function, which then loops through the countries, adding them as a list item (li) to the countries unordered list (ul).
While you are handling offline mode gracefully by only making the network request when the user is online, you can enhance our app by using another HTML5 capability: local storage. (See Part 2 of this tutorial for more on local storage.)
In the previous code listing, you have updated the initialize function to handle offline mode. If the user is offline, it checks whether the browser supports localStorage, and if it does, it retrieves the stored list of countries. If there is a previously saved list of countries, you pass this list to the displayCountries function.
We have also updated the retrieveCountries function to call the storeCountries function after receiving the API response. The storeCountries function again checks whether the browser supports localStorage, and if it does, stores the list of countries for later use.
If the user is online, make the API call to retrieve the list of countries. If the user is offline, check for the locally stored countries list, and if it exists, use that data and display it to the user. Check the status to determine whether the browser is online on the page load. Also see if the status changes while the user is still on the web page. You can use online and offline events for a notification in case of any status change.
You have updated the initialize function and added event listeners for online and offline events. If there is a change to the browser’s status, these listeners will be called and the code will write the new status to the DOM. The cache manifest file needs to be modified, as shown in the following code listing.
The manifest file can have different sections to inform the browser what to cache and what not to cache. In our example manifest file in the previous code listing, you have a CACHE section to specify all files required for offline support that should be cached. In the NETWORK section, we specified to the browser that anything coming from the domain listed in this section should not be cached. By not specifying these sections, any resource listed by default in the manifest file will be cached.
Part 4: Speed up your mobile web applications with HTML5 and Web Workers
Web applications have traditionally been stuck in a single-threaded world. This really limited developers in what they could do in their code, since anything too complicated risks freezing up the UI of the application. Web Workers have changed all of that by bringing multi-threading to Web applications. This is particularly useful for mobile Web applications where most of the application logic is client-side. In this tutorial, you will learn how to work with Web Workers and discover which tasks are most appropriate for them. You will see how you can use with other HTML 5 technologies to increase the efficiency of using those technologies.
Multi-threaded JavaScript on mobile devices
With advancements in browser technology and various new features that are now a part of web standards, websites have evolved into web applications with functionality on par with native apps. These web apps do a lot of things: they render user interfaces, make API calls, process data, handle UI events, and manipulate the DOM. Many programming languages support multi-threading or concurrency in one way or another. JavaScript as a language is single threaded; in simple terms, it can only do one thing at a time and multiple scripts cannot run at the same time. So, if our web app is executing a statement or a block of statements, which takes a long time to complete, all subsequent statements will hang up until that statement(s) is processed.
One way developers have solved this problem is by using asynchronous functions, which are non-blocking, but not concurrent. Luckily, HTML5 has provided a better solution. The web worker specification provides a standard API for spawning new background threads and enables concurrency in web apps. Web workers execute scripts in isolated threads and do not share resources with the main UI thread. The script executed by the workers has to be in a separate file. This allows web workers to perform their tasks without interfering with a main thread and without interrupting the user interface.
As you can see, the constructor of the worker takes the name of the script to execute as an argument and returns a Worker object, which represents the newly created worker.
It's important to note that web workers have access to a subset of JavaScript features. Web workers do not have access to a parent object, window or document object, and cannot access the DOM. So with a limited feature set, how do you use them, and how can you send and receive data between the main thread and the worker? To understand this, look at the following code listing.
The communication between the worker and the main UI thread is done using an event model. To send a message or some data to the worker, the main thread calls worker.postMessage(). This will invoke the onmessage function inside the worker script. Workers can access the data by retrieving the data property of the message object.
Workers can use the data sent by the main thread, do some processing, and send the result back to the main thread using the postMessage function in the worker script. This will invoke the onmessage function in and the main thread will receive the message sent by the worker.
The web workers API is simple, but quite powerful. In the next section we will see how to use workers to build web apps with better performance.
Improving performance with Web Workers
Web workers are a perfect candidate for anything that takes time to process and may not be required by the user straight away. Our web app can spawn a new thread, perform the task, and display the results to the user when it is available, without slowing down the app and affecting user experience.
Let’s imagine you are building a web portal where a user can access various information. One piece of the information you want to display is the current temperature based on a user’s location. While this information is useful, you do not want to keep the user waiting. You can use web worker to retrieve weather information in the background and display it to the user when it is available.
We discussed the geolocation API and how to get a user’s location in the first tutorial of this series. We will take the example we built and enhance it to use web workers.
On page load, we call the initialize function, which uses the geolocation API getCurrentPosition function to get the user’s location and then retrieve weather information using the user’s geolocation coordinates. We are using the Open Weather Map API for this example. Please note that you will need to create an account with Open Weather Map and generate an API key, which is required to call Open Weather Map APIs. The free account is limited, but should be enough for our simple application.
You will take the code in the previous code listing and enhance it to use web workers. You will implement the functionality in a way that if a browser does not support web workers, you can still handle it and provide a good experience to your users.
Before you start, it is important to note that worker threads have limited access to the geolocation navigator object, and you cannot use the getCurrentPosition function to retrieve user location within the worker thread. So we will use the parent thread to retrieve the user location and pass it to the worker thread for further processing.
Let’s start by extracting the code to retrieve weather information into a separate file util.js.
We have moved the getWeatherInfoByLocation function into the util file. The function now takes two parameters: the location object with latitude and longitude properties and a callback function that will be called once we receive the data from the API. Remember to replace API_KEY with your own Open Weather Map API key.
Next, we will update the web page to use util.js.
We have made a few changes in the code. First, we loaded the util.js file, which gives us the getWeatherInfoByLocation function. Then we updated our initialize function to call the handleSuccess function when the user location has successfully been retrieved. The handleSuccess function returns the call getWeatherInfoByLocation function, passing the geolocation coordinates and showTemperature function as the callback. When the weather information is retrieved by the util function, it will invoke the callback showTemperature function, which, as before, will write this information to the DOM.
Now let’s create our worker script.
The worker script is very simple: It has the onmessage function, which can receive a message from the main thread. In our case, the message will have the user location information. The worker script uses the same util script util.js as used by the main thread. On receiving the user location, it will call the getWeatherInfoByLocation function, passing the user location and worker’s postMessage function as the callback. This will ensure that once the weather information is received it will be passed to the parent thread.
Now it’s time to tie things together. Let’s update the handleSuccess function to use web workers when available.
As shown in the previous code listing, you first check if the browser supports web workers. If it does, create a new worker thread and pass the user’s location to the worker using the myWorker.postMessage function. This will invoke the onmessage inside the worker script. When the worker has finished processing, it will post its postMessage function, which will invoke the onmessage function in the main thread When the main thread receives the message from the worker, it will pass the weather information to the showTemperature function for DOM manipulation.
In our example, we used web workers to improve our web app’s performance by spawning new worker threads and performing some of the tasks outside the main thread. We also ensured that in case workers are not supported by any browser, we can still retrieve weather information and display it to our user. Although this is a simple example, you can use the same concept in complex scenarios.
Part 5: Create mobile web applications with HTML5 and its new visual UI features
HTML5 comes with plenty of new features for mobile Web applications, including visual ones that usually make the most impact. Canvas is the most eye-catching of the new UI capabilities, providing full 2-D graphics in the browser. In this article you learn to use Canvas as well as some of the other new visual elements in HTML 5 that are more subtle but make a big difference for mobile users.
Getting graphical with Canvas
Canvas offers a native drawing API for web browsers. Using the Canvas API, you can draw different shapes like lines, circles, and polygons, and fill them with colors and gradients. You can create text and perform various geometric transformations. It can be used for things like data visualization, animation, photo, and video processing. The best thing is that Canvas is well supported by the recent versions of nearly all popular browsers.
Let’s take a look at how to create a graph using Canvas. The following figure shows a screen capture of the app: a bar graph of yearly results.

The graph is generated using the Canvas API. The following code listing shows the HTML code used to create this graph.
The body of the document contains a Canvas element. When the page is loaded, the initialize() function is called. This function passes the static report data to the generateGraph function, which is the function that generates the bar graph.
In the generateGraph function, you first set up the objects needed to create the report, like the width and height of the canvas, and padding variables. You also create the Canvas context object, which will be used for the actual drawing. Then you draw the bar graphs by iterating over the report data. You set the fillStyle property using the rgba notation to set the color and the alpha value (transparency of color is discussed in a later section). After setting the fillStyle property, create the bar graph for the data point using the fillRect API. Here, we specify the (x,y) starting point of the rectangle and its height and width. Next, re-define the fillStyle to print some text as part of the report. Use the fillText API to draw text on the canvas. This API takes the (x,y) starting point and the text. You then do this for each of the data points, creating a bar graph with a label below it.
Next, draw the horizontal and vertical axes. For each of these, use the moveTo API to set the point from which you will begin to draw a line. Then use the lineTo API to draw a line from the starting point to the end point passed in to the lineTo call and call the stroke API to draw the line. Next, you draw the gridlines along with their labels. Draw evenly spaced lines using the same combination of moveTo, lineTo, and stroke.
In this example, we have discussed some of the commonly used Canvas APIs. There are many other functions that are part of the Canvas API, allowing you to do some amazing things.
The wonderful world of CSS
When talking about HTML5, you may instantly think about the HTML tags and many new tags introduced as part of the specification, but the HTML tag is just part of the story. JavaScript and CSS are equally important parts to web development. Many new user interface elements were introduced as part of CSS 3.0. In the following figure, you can see a web page using some of the CSS 3.0 features.

Let’s look at the code that generated this web page.
Inside the body of the page, the first thing to notice is the header tag, a new HTML element introduced as part of HTML5. This element can be used to define a header of a page or a section.
If you look at the style element in the code above, we are using CSS selector header > h1 to style the heading text. This will make the text yellow and the background with a linear gradient from red to yellow. While these styles work well with the latest version of most browsers, some browsers, especially the older versions, may require a browser specific prefix for some of these styles to work properly. After the header, we have a table with ID dtable. Use the css nth-child selector. Here, the CSS displays odd table rows in a navy color and even rows in a green color. In the past, this would have required custom JavaScript code, but it can now be done easily with CSS selectors.
The last visual element on the page is the red-colored text field with the label What's your name? and a Rotate button. Here you have used a selector that targets a specific attribute of the element. The selector input[type="text"] is only applicable to input elements with type text.
Let’s see the following code listing to see what the Rotate button does.
The button calls function rotate when clicked. This function uses JavaScript to change the CSS that is applied to the formSection div. When clicked, the button will rotate the div by five degrees counter-clockwise. This is achieved using the transform style with the value rotateZ(-5deg). We also set the transform style to transform 2s ease-in-out to make the rotate take two seconds, starting slowly, accelerating, then slowing down again. In the following figure, you can see the rotated fields with a button to undo the rotation.

Now let's look at some of the interesting layout, image and text effects introduced in CSS in the following figure.
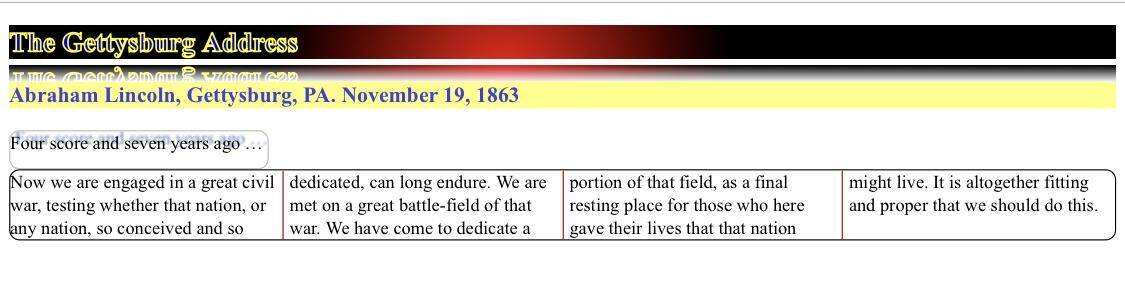
The code for this page is in the following code listing.
Let's walk element-by-element through this code. First, we have a heading “The Gettysburg Address” with the following styles:
- We used
-webkit-text-fill-color,-webkit-text-stroke-color, and-webkit-text-stroke-widthstyles to create the blue-inside-the-yellow effect. - A red and black background is placed behind the text by setting the background style
-webkit-gradient. In the previous example, we used linear gradient, but here we are using radial gradient. - Finally, we applied a reflection to the heading by setting the
-webkit-box-reflectstyle. This is set to reflect the heading five pixels below it, with a gradient effect applied to the reflection, making the reflection seem to fade away.
For the next heading, we applied simple styling with text and background color. We used the rgba function to specify the red-green-blue values and an alpha transparency value. An alpha transparency value of 0.0 is transparent, and a value of 1.0 is completely opaque.
Next, we have a paragraph with a border around the text. The rounded corners for the border is achieved using border-radius style. We also applied a shadow to the text by using the text-shadow style. Finally, as you can see, the text is quite long for the height and width set for the parent div; by setting the text-overflow style, we get a nice ellipsis (…), instead of truncating the text.
Finally, you can see how the last paragraph is displayed as four columns, which is achieved by using the column-count style. Each column also has a column separator using the column-rule style.
Along with the features we have discussed, there are a lot of new features introduced in CSS 3.0 to help achieve amazing visual effects, which work across different browsers, without the need to write complicated custom code.
New semantics
Many new elements were added as part of the HTML5 specification. While some of these are visual elements, others add extra semantic meaning without any change in look and feel. These new semantics are important to make the web apps accessible for non-visual users, including anyone using assistive technologies like screen readers and even programs like search engine crawlers.
The following figure shows a web page using some of the new semantic elements.

This example has a header element, a nav element, an article, a section, and an aside element. These elements do not cause any special rendering. They just add semantic value, and you can use them to write CSS that gives them visual treatments to match that semantic value.
The code for the page is in the following code listing.
In the code above, we have used a number of new elements previously mentioned. We have applied CSS styles to create a box with rounded corners around the header and to create separators for the nav element. We also used the text overflow styling on the aside element. Using the HTML5 semantic elements with CSS 3.0, we have not only created a much more meaningful markup, but also styled them without much effort.
Now let’s look at the following figure for visual elements introduced as part of HTML5.

The screen in this figure uses many new form elements available in HTML5. Although these may look like existing elements, they provide better visual representation and user experience based on a user’s device and browser.
Let’s look at the above web page on the iPhone Safari browser in the following figure.

As you can see, the date field that looked like a normal form field is rendered differently on an iPhone, giving users a better experience. The code used to generate the form is shown in the following code listing.
We have used many new HTML5 features in the previous code listing. We used the required attribute to mark a field as required, which can also be used during form validation. We have also used the autofocus attribute that allows us to focus a field automatically when page loads.
For many of the form elements, we have used the placeholder attribute to provide a hint describing the element. We have also used new types for the input fields like email, phone, date, range, color, and URL. The input fields with these new types might look the same, but they provide different experiences to users based on their devices and browsers. For example, we looked at how the input field of date type looks on an iPhone.
Summary
In this tutorial, you explored the features of HTML5 for mobile web apps, including geolocation, local storage, offline, web workers, and more. Thanks to HTML5 features like offline support and local storage, web applications can provide the functionality, performance, and user experience similar to the desktop experience, if not better. By using the new APIs and many of the visual features of HTML5, including Canvas, CSS 3.0 features, and new semantic elements, you can build super performant and progressive web applications that are on par with native applications.
Acknowledgements
This tutorial was originally written by Michael Galpin and published on June 2, 2010.
